FirstLight Workshop

Where's Jay?

Absaroka Ranch Workshop


We just wrapped up our FirstLight Absaroka Cowboy Workshop, what an amazing event!  Driving into the Absaroka was a treat in its own, as the dramatic landscape in the photo above will confirm.  With the stunning background of the Absaroka Mountains, the setting was spectacular.

Budd Betts and the Absaroka staff were incredible; we ate all our meals together in the main building and Sheryl, the chef, outdid herself with each meal.

In this blog you’ll find an image from each of our students, I hope you enjoy looking at this very impressive body of photography, and hope to see you at a future FirstLight Workshop!


Thanks for having checked these out!  If interested in getting on our FirstLight mailing list, you can click here to be taken to a simple registration.  The mailing list is we first announce upcoming FirstLight events, we don’t share or sell this list.

Below is a list of workshops and lectures I’ll be doing over the next few months, hope to see you there!

Maine Media Workshop:

“Beyond the Single Image”
August 26 – Sept 1

NATIONAL GEOGRAPHIC EXPEDITIONS EVENTS:

National Geographic Weekend Photography Workshop: Tucson
Oct 25-28, 2012
Feb 28-Mar 3, 2013
Apr 25-28, 2013

National Geographic Expeditions,  Antarctica, S. Georgia & Falklands:
Nov 7-30, 2012

Around the World by Private Jet:
Oct 8-31, 2013

Photography Workshop: Wyoming’s Cowboy Country:
June 23 – 29, 2013
June 30-July 6, 2013

National Geographic Traveler Seminars:

Creativity With Light
Sept 23, 2012  Denver, CO, Denver Art Museum
Oct 21, 2012   Columbus, OH – Columbus Museum of Art

Digital Photography Basics

Sept 22, 2012  Palm Beach Gardens, FL – Palm Beach State College
Dec 1, 2012   San Francisco, CA – San Francisco Art Institute


South Pacific

panoramic image of harbor on Nuku Hiva


Two young dancers on Christmas Island


Young dancer on Christmas Island


Cook Island

Bird life on Cook Island

Bird life on Cook Island

Cook Island

Reef life, underwater near Cook Island


On assignment in the South Pacific, landed in Papeete, then a flight to Nuku Hiva in French Polynesia. I’ve been shooting this entire trip, except underwater (can’t wait for the housing) with the Olympus OM-D.  I really believe this camera and it’s incredible form-factor is the future of photography.  The OM-D E-M5 is a weather resistant, solidly built body that just feels great in your hands.  I’ve been using the HLD6 power battery holder, which provides that great function of a vertical shutter release.  Shooting both RAW and jpeg, the camera is very fast, and in fixed focus, can operate at 9 fps.  With tracking it will accommodate 4.5 fps.  I’ll be posting a more in-depth reaction to the camera in a later blog.

On this assignment, in addition to Papeete (barely made my connecting flight)  I traveled to Nuku Hiva, Millennium Island, Kiritimati, Cook and Fanning Islands-a couple of those landings were not possible due to weather.  What I love about the South Pacific, most of it looks as you would hope it would look: beautiful atolls, aquamarine waters and the appropriate trees… On Christmas, my shooting time was quite short and the time of day was not the best.  The top two photographs of the little girl dancers were taken on Christmas, and are the subjects of the discussion below.  However, this is often the reality of travel photography and provides a window for a discussion of shooting in these less-than-opportune times.  What do you do when your experience in an amazing place is limited to those hours around “high noon”, with harsh light and extreme contrast?

1.     Take control of the situation  I was on Christmas Island, there were locals performing dances and drumming under the palms…or coconut trees, with that filtered light providing not the best lighting conditions.  I sat and listened for a while, which gave me time to determine which of the beautiful kids I wanted to ask permission to photograph in a better area.  When there was a lull in the music, I approached the obvious leader of this group, and asked if I could, with their assistance and help, move two of the little girls to a point near the lagoon that provided both a great background and a bit of backlighting.

2.      Watch your light  The light around the lagoon where we were located was harsh, BUT it was just a few degrees west of being totally vertical.  I found that great background, and at the same time I determined where the light was falling…by using my hand held vertically, I saw that if I posed my subjects with their backs to the water, I would find just enough shade on their faces.

3.      Use that flash you carried with you  Almost being counter-intuitive to shooting in intensely-lit environments, your flash can make the difference in a photograph and a forgotten attempt.  Using that fill in light can bring the light value up on your subject, providing a very smooth light and a balance between foreground/background.

4.     Set the cameras  ambient exposure  A great time to shoot in manual exposure, as you’ll want the exposure on the background to be constant, shooting in Program, Aperture or Shutter can alter the exposure to less than ideal.  Think about establishing your exposure without the flash initially.  This will provide the perfect background, I find that generally my background looks best if about a half stop underexposed.

5.     Set your flash to TTL  Before you leave on your trip, work a bit with that flash to see if the TTL or auto exposure is where you want it to be…I’ve found that most flash units come from the factory biased a bit towards overexposure.  In other words, it’s too bright.  You’ll need to experiment with this, the worst time for that experimentation is in the field….do this at home, where you have the time to get this figured out.  I always carry a cord that the flash attaches to and the other end goes to the camera’s hot shoe…this allows you to move the flash off-camera, which can help create a more pleasing, more specific style of lighting.  I also have a small warming filter taped over the business end of the flash, which makes that light a bit more “golden hour”-ish.  Also, use that diffuser that comes with your flash, or buy an after-market diffuser. These simply fit over the end of the unit, which helps soften the light.

6.     The closer the flash, the softer the light   This maxim will always hold true…I’ve seen so many aspiring photographers use those clever mini-softboxes, with expectation of great lighting…only to be disappointed by the harshness of the light…they had the flash unit too far from the subject.  The light source became a point light source, which is harsh.  Think of the sun at noon, it’s a very intense light source (from a pretty far distance) that produces a very hard and contrasty light.  Now think of that same sun, late afternoon in a tropical environment.  That humidity in the air, and the low angle of attack of light(going through more atmosphere and often pollution) essentially creates a huge light box, which allows the light to “wrap around” the subject providing that beautiful, soft light.


Western Coast of Africa: Canary Islands, Western Sahara & Morocco

Western Sahara: Dancer from Mallemin tribe dancing the Guerda

Western Sahara; where the desert meets the sea

Western Sahara: 4x4 trip through the Sahara

Snake charmer with cobra in Marrakech


Night guard in Medina of Marrakech

A trip of over 5 weeks, but over in the blink of an eye. Capetown to Morocco…an amazing journey of over 4, 000 miles, 37 days, 17 countries, and countless experiences.   There will not be a trip similar as this Expedition took us to ports that experienced the first passenger ship in decades.

Wrapping this up, our last stops included Western Sahara and the port of Ad Dakhla.  The Sahara Desert could be experienced in minutes as the sands of that vast expanse lapped to the edges of the port.  A drive into the desert took us to a beautiful spot where desert met the ocean.

Next on the list, Tenerife and the Canary Islands.  Slightly jolting, as this felt as if we were in a European city-and we were.  Great roads, beautiful buildings and beaches and a working infrastructure…then we went back to Africa.

Finally, we disembarked the Explorer for the last time in Agadir, Morocco, where we drove into Marrakech.   The pictures from Western Sahara and Marrakech are above.

Traveling and photographing with a mirrorless camera system was, bottom line, a delight.  Eliminating the weight of a digital SLR was not missed, and having a range of dedicated lenses to use was a huge benefit.   I worked primarily with an Olympus E-P3, the E-PL3 and an E-PM1.  I’m really looking forward to working with the new Olympus OM-D, as I think this will be the most professional “Micro-Four Thirds” camera out there, or the best mirror less system as well.  I’ve got an upcoming trip to French Polynesia, and I hope to have that in my hands for that trip.  Stay tuned for a blog from that beautiful place.


Western Coast of Africa: Liberia, Sierra Leone, The Gambia and Senegal

Monrovia, Liberia

Miatta Fabnbulleh and students at Obaa's Girl's School

Old Dacor Hotel in Liberia

Dancers at dockside in Sierra Leone

carpenter at rest in Freetown, Sierra Leone

The "Sierra Leone Refugee All Stars" photo shoot

The "Sierra Leone Refugee All Stars" Photo Shoot, part 2

Near presidential palace in Banjul, The Gambia

Street performer, Banjul, The Gambia

Small parcel farmer, watering his crops outside Banjul, The Gambia


women cook for Muslim celebration on Gorée Island, off of Dakar, Senegal

on Gorée Island of of Dakar, Senegal

young Senegese girl at Muslim celebration on Gorée Island, near Dakar, Senegal


Gorée Island, near Dakar, Senegal


            Moving in a northerly direction, we’ve visited four countries in a row:  Liberia and Sierra Leone, then one transit day followed by The Gambia and Senegal.  Things are feeling different the further north we go.  The music is taking on a northern African feel along with a subtle change in the character of the people.  We’re moving into more of a Muslim concentration which also brings more hesitation to be photographed.

Liberia and Freetown was first. “Obaa’s Girls School” provides an education for young girls who otherwise might be lost in their poor communities. An amazing woman, Miatta Fabnbulleh founded the school and she also is Liberia’s top singer.  The school was impressive: very clean, kids very well-mannered, and obviously in a learning mode.

Walking through the abandoned old luxury hotel, “The Ducor,” was an eerie exposure to a not so distant past of the hotels former glory and opulence.  Guarded by the state as there is expectation of re-opening, the impression is that those hopes of re-establishing the opulence of this fading building are not high.

Sierra Leone.  I’d been looking forward to this stop for several weeks as Jacob, our musicoligist, had asked if I’d be interested in photographing the group “Sierra Leone’s Refugee All Stars” for use in promotion as there are no usable photos of the group in their home country.  Morning was spent driving thru the city, an intriguing look at this impoverished country’s capital city.  (so slow was our drive, that a young girl leading her blind grandfather was observed passing our bus as it crept along).  Very slow, but also very interesting to see the moving pulse of this city.

Afternoon, Jacob and I walked the streets surrounding the port, choosing sites we’d return with the band near dusk.  We headed back out around 5, returning to those places…permission was granted at each place, the light was beautiful and I returned to my days as a rock & roll photographer.

The Gambia-how cool is that name for a country?  Not “Gambia,” it’s “The Gambia.”  Probably this name choice happened to differentiate from Gambia River.  An extremely narrow country running east-west, The Gambia is surrounded on three sides by Senegal and on the west by the ocean.  Legend has it that the length was determined by the path of the river, the width by how far an English naval boat’s cannon could fire..about 20 miles.  It is a fascinating place, with attendant photographic opportunities.

Last in this blog’s group was Senegal. Dakar was our stop, a large and intense city, and we were fortunate to be there on Saturday-meaning our transportation could actually move through the usually traffic-clogged corridors of the city.

Morning in Dakar found us heading by ferry to Gorée Island, one of the main slave trading areas on Africa.  Home to one of the infamous “doors of no return”, this place was a sad reminder of what incredible cruelty once existed on this continent.  Slaves, crammed into brutally hot storage rooms, often waited for weeks to be shipped out to the Americas and Europe.

We’re at sea, heading to Western Sahara-more coming soon!


Western Coast of Africa: Ghana

Ghana school group at Kwame Nkrumah Memorial

Ghana dancers

Fishermen near Accra

fishing boat and kid playing near Accra, Ghana

Fish seller in Albert Busomtwi-Sam Fishing harbour

Fisherman near Accra, Ghana

fishing boats near Elmina Castle

fisherman taking his dog for swim near Cape Coast Castle

Fishing village near Cape Coast Castle


            Looking back over this trip, I’ve been struck by how this is a voyage involving windows:  waking early morning as we pulled into Walvis Bay in Namibia and looking out my porthole and the breaking dawn over the harbor.  Hearing an announcement that Principe was off of our starboard side, and viewing that beautiful island through my porthole.  Driving on buses to various places throughout this Western Africa Expedition, and watching the literal “moving picture” of those places rolling by the windows of our bus, going from urban to rural and back.  And the window provided by our camera’s viewfinder in seeing these 17 countries and their people. Working in the 4 walls of that frame to me is the ultimate look into another world.

As this trip is so much about cultural and societal components, viewing people thru that camera’s window is a huge part of this experience.  This certainly opens the door to the discussion on photographing people and the highly debatable question of paying a photographic subject.  You’ll find further discussion of this below.

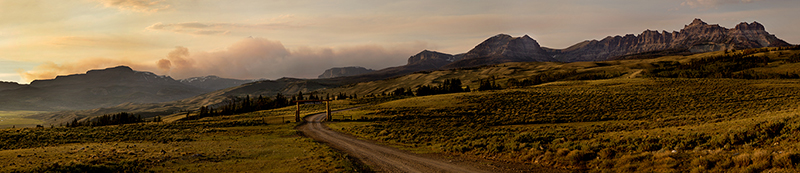
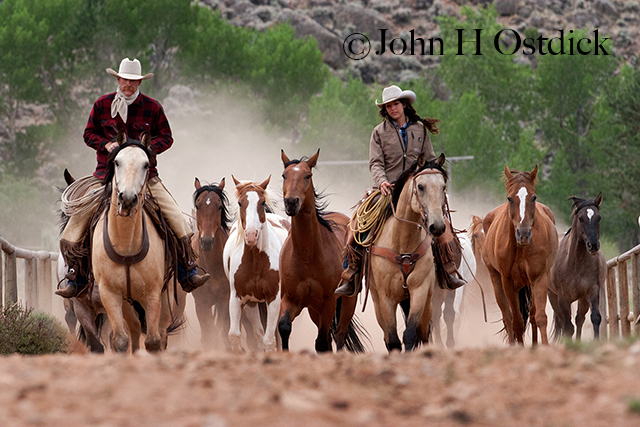
            Over the last two days, we were in Takoradi and Accra, Ghana.  Part of the Gold Coast of Africa,  Ghana is also home to the infamous Cape Coast Castle.  Originally built by Swedish traders for trade in timber and gold, the structure was later used for trans-Atlantic slave trade.  Having changed hands several times after its construction in 1653, the fort was held by the Swedes, Danes and the English.  This was one of the African sites visited by President Obama and family in 2009.

Fishing is a main source of food and income along the coast, and we visited two fishing ports, one directly below the Cape Coast Castle.

The issues of paying to make photographs

            Today, with the ubiquitous of Smartphone and its high quality digital camera, more than ever “everyone is a photographer.”  Combining that with the massive travel industry taking clients into the farthest reaches of the world, more than ever photographers (visual archivists??) are facing the issue of when is it appropriate to take a photo, and when is it appropriate to pay for that “event.” For the traveler, this rapidly is becoming on of the most uncomfortable issues out there today: when do you pay a subject to photograph them.?

One of the most important parts of this discussion is regarding photographing children. Often one of the easier subjects to approach for a photo, a child’s excitement over the fact of being photographed can make that process easy as well as visually productive.  In large tourist centers around the world, the traveler will often be confronted with children asking for money, for a photograph or just as baksheesh ( a tip).  India, as an example, is having problems in keeping kids in school in and around the tourist cities such as Agra, as families find that a child begging for money (often from posing for a photo) can produce more immediate income than going to school.  It’s really easy to hand a child what may seem to us an insignificant amount of money, which only is exacerbating that problem.  Please don’t provide money to children.

Payment in regard to photographing adults is a much more complex issue and problem.  I try not to pay anyone if at all possible, this obviously sets up an expectation for that next traveler coming along, and I think it negatively impacts that relationship the traveler hopes to find.  If photographing in or around a market, I may find something I’d like to purchase from someone who may be a potential photographic subject.  Upon purchase of that item, I’ll then ask if I may photograph that person.  Often this may eliminate the expectation of payment.

In many developing countries, the traveler is seen as a “walking wallet,” as we are obviously wealthy enough to visit that far-away place and carry expensive equipment that may cost more than a years’ earnings to many of the locals.  So, how do you deal with this “gulf?”

When I walk into an area in which I may want to photograph, I’ll approach my potential subject and introduce myself.  I’ve watched tourist buses disgorge their camera-wielding groups, and have seen those people stand like a firing squad in front of the locals (be it the fish market, the market, anyplace with people going about their daily lives) and never attempt to approach those folks.  The idea of asking permission or doing something as simply civil as introducing themselves to that person, never enters their minds.   Think how you’d feel if while out raking your yard, a busload of “foreigners” stopped in front of your home and everyone came of that bus with the intent of photographing you whether you liked it or not.   This simple civil gesture of meeting someone can go a long way.

If someone goes out of their way for me in terms of helping my photographic moment, I may pay that individual.  My feeling is that I am taking their time if it extends into a longer period of time, and that payment can be seen as a legitimate “thank you” for their help.  It is never easy deciding when to pay or not.

There are many tourist places, such as the square outside the souk in Marrakech, where the snake charmers, the dancers, magicians, and other street artists create a scene that is a photographers dream.  But, these people are there to make money, and any camera is noted and watched like a hawk.  You will be expected to pay for photographs, an established price can usually be determined by asking at your hotel.  Carry a pocket full of coins, don’t overpay and don’t get into arguments.  And don’t try to sneak pictures.

In this process of photographing our travels, I think if you show genuine interest in that person and what they are doing, you can open a door more honestly .   For me, the camera has always been a reason, an excuse, to walk up to someone who I may find interesting, and ask to essentially enter his or her world for a brief time.  Isn’t this why we travel.

Walking into a new place where you are obviously NOT a local, and carrying a camera can change the dynamic of that place.  If photographing in a small village square, think about getting there early, so you are more of the scenery when people start arriving, instead of walking in and having your mere physical presence disrupt that scene.  Also, give yourself time to allow people to get used to your  presence.  Don’t be the “Ugly American”, photographing people when they are giving you obvious signs that they don’t want their photos taken.  Be aware of local customs, some places still feel that the camera can steal something of that persons’ being.   And, above respect someone when they say no…

As I said above, this is not an easy subject..you, the travel photographer, should remember why you are there; to experience another culture and to capture images that say something about the culture.  When to pay or not to pay will be yours to decide at that moment.


Western Coast of Africa: Benin & Togo

Voodoo ladies in Benin

Voodoo priest in Benin

Dancers at port in Ganvie, Benin

Woman in fish market at port of Ganvie, Benin

Ganvie, Benin fisherman pulling in net

fishmarket near Ganvie, Benin

Monkey skulls at fetish market


Kids at Akato Viepe school, Togo

Student at Akato Viepe school, Togo

Villagers in Akato Viepe Village, Togo

            This adventure continues at a rapid pace: today we were in Togo; yesterday it was the Western Coast of Africa country of Benin.  Both were incredible visual opportunities, with the abundance of visits to great places we were provided.

Benin, once known as Dahomey, is on the Gulf of Guinea, and our stop was at the capital city of Cotonou.  A chance to meet a local voodoo leader and his contingent provided some nice images.

Togo was another full day, starting with a visit to a rural school.  The light inside the school was filtered from large, grated openings on either side, creating warmth that was enhanced to a beautiful and overall sepia tone by the wooden desks and light-brown outfits of the school kids.  The village of Akato Viepe was next, which included a ceremonial meeting of the king of that village.  The day ended with our group heading to the local fetish market, a bizarre place of desiccated monkey skulls, dried chameleons, and a myriad of other dried animal parts.  Considered the local “pharmacy” for traditional tonics and fetishes, this bizarre place provided a very interesting look into the animist belief of many Togolese.

Photographing in hard light

This trip has offered some incredible photographic opportunities, many of them in the mid-part of an equatorial light situation.  In other words, very hard, harsh and often unflattering light. So what does the photographer do?

Try to move your subject into open shade if at all possible, and when photographing people, this form of lighting can not only save the shoot, but it can provide wonderful and soft light for portraits.  I’ve included the photo of the group of villagers in front of the orange wall, shot in shade just barely off the sunburnt sand in the foreground.  In fact, that sand provided a great “fill-in” light, providing the beautiful and warm light in the photo.

Use the hard light to your advantage The photo of the Gavinae fisherman with the net is a good example of using hard light to advantage.  The net is in brilliant sun; he is almost a silhouette, just enough detail in his face to provide a little separation.

Shoot backlit and add fill flash or a reflector this allows you to balance foreground and subject in terms of equal lighting.  I love working with reflectors as they provide the exact look and exposure you see.  It can be brutally bright for the subject, so think of telling that person you’re photographing to close their eyes until you count to three, when they’ll open their eyes for a second..which may help in eliminating the squint of someone in that often-intense light of the reflector.

Or, use fill flash from the camera, exposing for the overall scene and adding flash to “fill” the subject.  This takes some practice to make it work, but I’ve discussed this idea in earlier blogs-including using filters on the flash to make it more pleasing, underexposing the background slightly to force attention to the subject, and slightly underexposing the flash ( I think almost all camera manufacturers send their cameras out with the bias on flash set too bright)

Watch the background!  It’s so easy to be so focused on the subject, that you are not seeing the blown out sky in the background, so be sure and let your eye check the edges of the frame to see if there is an area that is too bright.  It may be able to eliminate that by a little move to either side, or moving the camera angle up or down.  Remember, our eye goes to the brightest area in photo.

What the heck, come back at dusk!  If I have the luxury of time, I’ll often use the  middle part of the day to scout an area, checking where & when the sun will rise or set, and come back later or plan an early morning shoot.  That “golden hour” can provide incredible light, and often in busy places you’ll find that you are too early for the crowds, or everyone is at dinner, leaving you to enjoy that wonderful shoot session in awesome light!


Western Coast of Africa, Cameroon

Bilingual school founder Phelexine Bola Nkwenti & assistant

worker at tea plantation, moving tea leaves on drier


worker at tea plantation

loading tea leaves on tea plantation

tea plantation worker

tea plantation worker in protective garb

women workers at tea plantation

tea plantation worker in protective garb

Anchoring off of the coast of Cameroon, which in my opinion is one of the coolest names of a country.  One of the most diverse countries in Africa, it is called “Africa in miniature” for it’s geological and biological diversity.

Our first stop was in Kribi where we went to a standard bilingual primary and nursery school…being Easter Sunday, there was no school in attendance, but the woman who started the school, Phelixine Bola Nkwenti, met our group for an explanation of the two languages of that school-English and French.  The French-speaking speakers are eager for their children to study English as this is seen as a major advantage for advancement.

Afternoon we made our way to a spot on the Lobe River to board pirogues, and headed upriver to a “Bagyeli” encampment.  These people had previously been referred to as “pygmys” which really meant a people of shorter stature.

Monday, we anchored off of Limbe, Cameroon, heading to a banana plantation in the morning and a tea plantation in the early afternoon.  Both these places provided a great insight into the workings of the country, far away from any real form of tourism.

Working in the tea plantation provided some really beautiful light…walking in, felt I’d found the Sistine Chapel of lighting…overcast light bouncing off of a white building through large and old paned windows.  High ISO and slow shutter speed, but beautiful people to photograph, so steadiness in holding the camera was key.

In these situations, there are a few “rules of thumb” the photographer can follow:

High ISO.  Today’s cameras handle those high ISO’s well, and I’d rather deal with a little noise and have the image than a really slow shutter speed that can reflect any movement or shake issues.  Realistically, with a normal to wide lens, the photographer can often go down to 1/15th of a second and still obtain sharp (or at least apparently sharp) images when using image stabilization.

Shutter burst mode.  When shooting those slow exposures, put the camera in burst mode.  Hold the shutter down for a 2-4 burst, this allows the camera to “settle down” after the first image, providing more probability of sharpness on succeeding images.

Become a bipod. Don’t hold that lens from the top, instead cradle in your left hand (if right handed, reverse if necessary) the lens, essentially providing support for the lens and camera in that hand..use your right hand to gently grip the camera.  Turn your body so you are shooting across your left shoulder..a straight line through your feet would almost point to the subject.  This stance provides much more stability, allowing those slower shutter speeds.

Take your exposure off your subject’s face  Even in S, A or P mode (or TV for you Canon folk) point the camera towards the face of your subject, press the shutter half way down and recompose while holding the shutter down.  This provides the correct exposure for the most critical component in your photograph, if the face is out of focus, effectively the photo will be seen as out of focus.

Focus on the eye nearest the camera It’s interesting, if you focus on the eye furthest from the camera, often the perception will be that the photo is out of focus, if the eye nearest the camera is in focus, the images is perceived as sharp.  We look for eyes in photos first, then sharpness

Take a deep breath, and when ready to shoot, slowly let your breath out, gently pressing the shutter during the exhale.


West Coast of Africa: São Tomé & Príncipe

Approaching Príncipe

São Tomé & Príncipe

Two wonderful days on the islands (and country) of São Tomé and Príncipe.  Located off of the northwestern coast of Gabon, it’s the second smallest nation in Africa.  Part of an extinct volcanic range, the larger island of Sao Tome sits just north of the equator and was our first stop.

Our bus drove through the only flat area of the day, the port city and quickly started going uphill through forests and villages.  A beautiful waterfalls and an old Portuguese coffee plantation were the first stops, then a drive through rainforest-and rain-to our lunch at another old plantation.  The day wrapped up at the small factory of Chocolaterie Corallo.

Principe was next, after an overnight sail across the 87 miles of ocean separating the islands.  Our visit was centered around the stunning, and remote,  Bom Bom resort, which looks like it was straight of the South Pacific.  In the afternoon, we drove in small groups over to the city of Santo Antonio…then back to Bom Bom for the remainder of the afternoon.

The Idea of Expedited Shooting

Traveling in and working around population centers, be it large or small, offers the photographer the chance for street photography as well as that opportunity to photograph people.  I generally work with two camera bodies, and I’m really enjoying working with the mirrorless system..my cameras of choice are the Olympus Pens.  Small and light enough to work with all day, and unobtrusive, these high-quality cameras may be the perfect answer for the travel photographer.

Text continues below the photos, along with shooting tips

Ilhas Tinhosas, bird habitat
Road through the rainforest of São Tomé
Old Portuguese coffee plantation on São Tomé
Seaside old Portuguese Fort on São Tomé
Dancers circle at plantation on São Tomé
São Tomé and the old coffee plantation
sunset on Principe
Bom Bom Resort on Principe

When shooting in a place that is new to you, a few thoughts:

Research the place before you get there. The Internet is an amazing research tool that can provide the basics as well as in-depth information as to events and festivals, which may provide photo-rich opportunities.

When my cameras go on my shoulder and I head out in my location, I describe it as a switch going on in my head: I’m thinking and seeing photographically.  Being prepared is the 1st step in this process, so batteries are charged (both the camera and myself), shooting mode is in the appropriate setting..I usually use manual, but for a lot of street photography, I’ll use the Program mode as I’ve found it is in synch with my shooting style.

An idea from a photographer friend; when shooting in Aperture or Shutter Priority, put the camera on “Auto ISO”.  This eliminates the frustration of walking into a dark environment with the camera set on a low ISO, and you see a great moment, but the shutter speed is so low your file is unusable due to shake.  The Auto ISO setting will default to the lowest ISO for your preferred aperture or shutter speed, allowing you to shoot more successfully.  Many cameras also provide a setting in which you can control the range of ISO

If possible, get to your intended location early, this may help as you are part of the scenery when people arrive at that market or area…instead of walking in with cameras and equipment, which can be disruptive.

Ask permission, make eye contact when appropriate, a smile can go a long distance…try learning a few words of the local language..this can help even if you garble that expression, it can be seen as you’re at least trying to communicate instead of expecting them to communicate with you

Share your images, this can be such a door opener and can make that short relationship in which you’ve entered be that more productive.  Also, be sure and send images to them…ask for an address or email, and be sure and follow-through

If someone says “no” to being photographed, honor that request.  In some parts of the world, you may receive very strong signals that it is NOT appropriate to photograph, so be tuned in so you don’t miss those messages.

When you’ve approached and received permission to step into someone’s life, make sure the camera is ready. Nothing worse than getting that permission, fumbling with your gear, and losing the confidence of your subject.

When photographing someone, if possible give the process time…if they turn to you and stop doing what was interesting and what drew you to that moment,  give it a few minutes, asking via sign language if necessary for them to go back to what they were doing. Again, this may take a little time, but if you stay, and your just watching, you become boring and they will go back to doing that great thing you saw initially.  Then, your photos will happen.  Above all, know when it’s time to leave so you don’t overstay your welcome.

The small city of Santo Antonio on Principe
Bom Bom Resort on Principe


West Coast of Africa, Angola, Congo and Gabon

Luanda, Angola

Two days one night in Angola.  Our first day and initial port was Lobito where we cleared customs and made our foray into this rarely visited (not for oil workers, but true for travelers) country.  After almost 30 years of civil war, this country is working on rebuilding so much infrastructure.  Roads, buildings, railways, the list goes on and on.

We took the Benguela Railroad from Lobito to seaside village of Benguela, many of the cars built in the 19th century.  The societal landscape that rolled by the open windows of the train cars ranged from abject poverty to desert landscape with stucco-colored homes rising out of the sparsely covered hills.  Several modern buildings were evident as was the beautiful, semi-new soccer stadium, which was built a couple of years ago for the African Cup (Angola made it to the third game) and hasn’t been used since.


Aboard the Benguelan Railroad

Next was the capital city of Luanda, an unbelievably packed city of cars, people and noise.  Triple parking is common, and a trip of a kilometer can take almost an hour.  It’s really amazing the amount of infrastructure in this oil-rich area is being funded, and built, by the Chinese.

Congo was next.   Arriving in Pointe Noire mid-morning, we waited for our pilot to oversee our passage into the harbor.  Only a short time overdue, give or take an hour, and we were anchored.  That was the easy-and quick part of the day.  Bringing the immigration people aboard took an additional longer expected time, and our early afternoon departure was pushed back by over an hour.  But, the amazing aspect is how we are experiencing the ground floor of a tourism industry in Angola as well as Congo.

Driving through Pointe Noire, Congo

Our bus ride to the outskirts of Pointe Noire was fascinating.  Like a rolling cinemascope show, the fabric of the city rolled by our windows, changing slowly but definitely as we headed to the countryside.  Traffic is not in same universe as Luanda, and observing the building, markets and traffic was an event in it’s own right.  Congo grows on you.

Afternoon in Angola

A day at sea was followed by a landing in Libreville, Gabon.  A country that devotes 11% of its lands to National Parks, the Gabon hosts visitors very well.  Friendly people and a city that is greener than the last two stops, Libreville feels like a manageable place.  This was a full day out, ending in a beautiful rainforest a few miles outside the city limits.

Working on photographing people:

This is one of the toughest areas of photography…intimidating for many photographers, approaching a total stranger can be a stressful process. This stress is not what one is looking for on a vacation, but when photographing someone whom you’ve never met before still requires you, the photographer, to “work the scene”, taking advantage of this short “relationship” you’ve established.

I’ve included these pictures along with my thought process.  In Libreville, we were at an open-aired church, under an overhang (mid-day, tropical light provides the impetus for open shade) I noticed a beautiful Gabon woman sitting in the diffused light.  I shot a quick frame, made eye contact, and asked in the international language of gesture if it were okay to photograph her.

Initial photo shot


2nd frame, tighter but with bad shadow at bottom

final frame


Checking my monitor, I noticed that the initial  frame was nice, but reflected the fact of it being a grab shot. A little too much window frame at the top of the picture, a vertical blue bar on the far right.  I reshot with the newly composed picture in mind, eliminating those visual distractions.  This produced a frame that was almost there as there was now a dark shadow running along the bottom of the picture.  Knowing that if I knelt to eliminate that shadow, I decided to accomplish my framing by cropping the photo.  The result was a much “cleaner” image, with space across the frame where the gaze of the subject could cross.  I also shot a vertical, a little too tight in the first version.  I moved back slightly which gave that important “breathing room” on the right side of the frame.


final vertical


The lesson here: be aware of the “heart” of your photograph, but always remember to look to the edges to check for any distracting elements.  Your viewfinder is your canvas.


National Geographic Expeditions “West Coast of Africa”

Heron on Namib Sand Dunes

Sailing the West Coast of Africa- sounds like a definition of 19th century exploration.  However, I’m sure those people had it a little rougher than we are experiencing this trip aboard the National Geographic Explorer.

16 countries over a 5-week stretch, from Capetown, South Africa to Agadir, Morocco, this adventure will provide an amazing exposure to an area of the world not commonly frequented by western travelers.

Arriving in Capetown after 4 viewings of “TinTin” on our long-haul aircraft, we overnighted in that awesome city.  My birthday was on the first day, and Becky arranged with Rikki Swenson for a surprise “event”.  Our group was taken to a seaside open-air performance hall for a concert by a South African band, “FreshGround” and after the event

Capetown concert of "FreshGround"

One desire of this trip was to reduce the weight of my camera bag as well as my physical “photographer” presence by using a smaller system.  On the recent National Geographic Traveler Seminar series, those attendees have heard me discuss the benefits of traveling with one of the new mirrorless camera systems as it is certainly more conducive to carrying and presents a less intrusive persona.  My choice is the Olympus Pen system.  Carrying three bodies in my kit and several lenses, my bag still weighs considerably less than my usual camera case.  The lenses range from an 18mm equivalent (the 9-18mm) out to a 600mm equivalent (the 75-300mm) Plus, I’m carrying a 24mm f2 and 90mm f1.8 (the 12mm and 45mm respectively) for not only low light demands but  to work more unobtrusively.

Namibian ghost town of Kolmanskop

We’re early in the trip, having spent time in South Africa and Namibia.  I’d shot an assignment in Namibia a few years ago, and our foray into the desert yesterday reinforced how astounding this place is.  Looking like a tortured moonscape, the landscape provides a constant photo opp of barren lands and twisted geography.

Below, you’ll find a few tips on the process of making panoramic photos…I’ll be posting more tips and trip overview as this voyage continues…next stop, Angola.


Namibian ghost town of Kolmanskop

Off-loading tuna in Luderitz, Namibia


A few hints to improve your panoramic photography:

Capetown, South Africa

  1. Always shoot vertically.  This provides extra room for error as well as deepening the photo. Nothing worse than doing your first pano attempt and having the picture tilted up or downhill, requiring a severe horizontal or vertical crop-which will make a really  wide and very skinny (top to bottom) photo!
  2. Use manual mode for both exposure and white balance: this will eliminate the chance of an auto white balance or exposure change over the expanse of the image.  If not comfortable with manual mode try this:  point your camera at a part of the scene which is towards the brightest range of the area you are going to photograph. Press the shutter down half-way, and note what the exposure readout is in the viewfinder.  Note that exposure, change the camera to manual mode and set the camera to that exposure
  3. Determine a good starting point on the left as well as noting where you’ll snap the final frame on the right (ending) point of the picture.  Be sure to “start and finish” the frame with good composition in mind
  4. Preferably use a tripod for this, as you want to rotate the camera on as center an axis as possible.  If you don’t have a tripod, don’t do a big “sweep” of left to right, instead try to move the camera as if mounted in place . This makes it much easier for the software to merge the photos
  5. Don’t use extreme wide angle, as this also creates a problem in merging the images.  A 35mm is a good wide angle for this.
  6. Start beyond the left end of yoru intended frame and make the last exposure beyond the right end of the picture
  7. Overlap each frame about 20-30% and use the focus points in the viewfinder as a reference point for the horizon.
  8. Import the photos into your merge software (Photoshop, Photoshop elements, Aperture, Lightroom as well as almost all manufacturers proporietary software, and watch the magic occur.